![]()
Installing RBS
Chips Yourself
NOTE: This option willl only be availlable
until March 30
![]()
![]()
Installing RBS
Chips Yourself
NOTE: This option willl only be availlable
until March 30
![]()
Tips: Keep in mind
as you are installing this product that it is not insulation but a reflective
shield. This being the case, more attention to coverage as opposed
to depth should be your focus.
Installation support can
be obtained Monday through Saturday during normal business hours Pacific
Time by calling: 602-980-4481
Some basic facts:
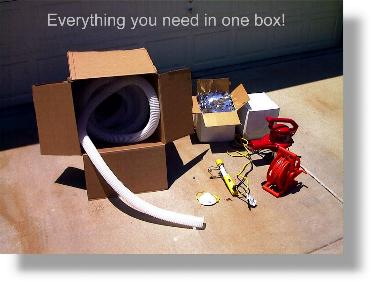
Blower, hose, light, mask and instructions in one box
RBS Chips shipped separately
Tips for installation
![]()
DESIGN CRITERIA PRIOR TO INSTALLATION
1) Does the attic
meet our recommended venting requirements? (8 -10 square feet of venting
per 1000 square feet of attic area, 50% at the peak of the roof (no ridge
vents please), and 50% at the soffits. Or install a thermostatically
controlled powered attic ventilator.
2) Is the attic accessible?
(not to be used for flat roofs)
3) Are your ducts leaking?
Visually inspect ducts at each connection while the fan is blowing.
Repair any obvious leaks with silicone. It does not make sense
to add a product to save energy if you are losing conditioned air from your
duct system. Check before doing attic work. If you are unsure
about this, have an A/C contractor (only if located in the attic),
look at it first.
All of these issues need
to be addressed prior to installation of RBS Chips.
LIGHTING
Use adequate lighting
so you can see the product as it settles on the insulation.
To accomplish this you need to see what's going on. Our installation kit
comes with a fluorescent lighting system that will not burn out when dropped
and stays cool to the touch. Use the plastic clamp to move the light
to the best position while working. Be careful routing the cord
as sharp truss plates can easily cut and may short out your light cord leaving
you stranded in the dark.
ATTIC PREPARATION
Begin by preparing the
existing insulation for coverage. This means removing boxes, Christmas
decorations, deer heads and golf clubs. If you have plywood down
on the attic floor for storage purposes, either lift it up an blow under it
or just blow over it.
Look in advance (especially
in tight areas), where you need to be with the blower. It may be easier
to bring a small piece of plywood to work off of. A piece of 3/8"
plywood 18" wide by five feet long will cover two 24" on center rafters with
ease and is easy to move around. Remember
you MUST have your venting issues covered BEFORE you add the RBS Chips.
NOTE: RBS Chips work by
limiting the movement of heat. Keep this in mind before you install
them over canned ceiling lights. What are canned ceiling lights?
Light fixtures that are installed above your ceiling that look like coffee
cans with light bulbs in them. From the room side these are flush with
the ceiling and typically trimmed in with a white ring. These cans
generate heat and must not be in contact with insulation or RBS Chips.
Insulation dams can be obtained at Home Depot or an insulation supply house.
The purpose of these dams is to provide a non-combustible barrier which in
turn insures convection will keep the light fixture from overheating. THIS
ONLY APPLIES TO LIGHT FIXTURE LOCATED ABOVE THE CEILING.
![]()

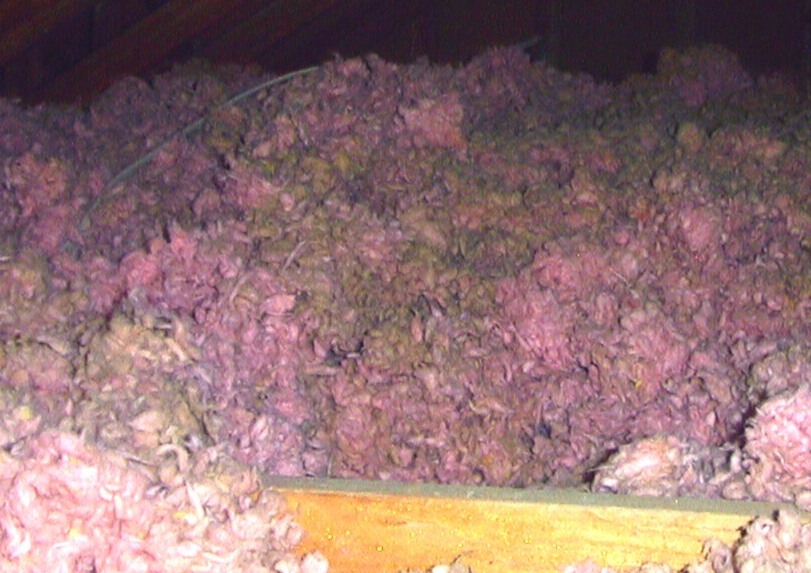
OVER BATT FIBERGLASS INSULATION
(above)
Fiberglass batts have
gaps and cracks that allow chips to fall into and be wasted. RBS Chips
are not designed to fill voids like a blown-in insulation product, only
cover the surface. We recommend adding a cap of cellulose over
batts to provide a level bed for the RBS Chips. You can obtain a blower
and hose from your local Home Depot store and is typically rent free as
long as you purchase at least 8 bags of cellulose insulation. Blowing
cellulose is important as it levels the top surface of your existing insulation.
If you already have cellulose (grey or brown in color) and there are no
ceiling rafters visible, just blow the RBS Chips on top and you are ready.
![]()
OVER BLOWN FIBERGLASS
(above)
Blown-in fiberglass is
typically too lumpy to provide an efficient bed for the RBS Chips. You
have two options:
1)
Level the attic by hand with a piece of flat material like thin plywood
or a kitchen broom. Any lump bigger than an orange should be leveled.
Blown fiberglass can be white, pink or yellow in color. If you have
ceiling raftes visible as shown in the photo above, blow in a cap of cellulose
insulation or have an insulation company do it for you.
2)
Blow in a cap of cellulose over the lumpy fiberglass until it is level.
Typically this requires a 2" cap of cellulose. Don't focus on "R-Factor",
only how flat you can make the top surface. The more level it is the
better the RBS Chips will perform. Since you are a do-it-yourself person,
go to Home Depot and purchase enough cellulose to accomplish this.
Or, you can have an insulation company do this for you. Typically, Home
Depot will let you use the cellulose blower for free if you purchase at least
8 bags of cellulose. 8 bags of cellulose will cap approximately 700
square feet. Buy more than you need as you can return what you don't
use. We have found that an insulation company charges $250 up to 2,000
square feet of attic just to blow in a level cap.
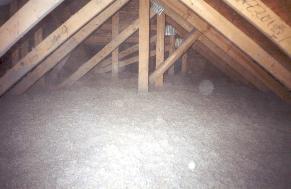
Completed cellulose cap over fiberglass. . . ready for RBS Chips
PLAN OF PROCEDURE
Look in the attic for
obstructions, boxes, anything that will hinder the movement of the hose
or power cord. Bring the blower, hose, light and power cord to the
far end of the attic. IMPORTANT: Putting in more chips than a good
coverage does not increase performance, only cost. The cost of RBS
Chips dictates a caution not to put too much in any one area. More
chips is not better, just a waste of product.
INSTALLATION
IMPORTANT: This section
needs to be read by both the installer and the person feeding the hose down
below.
The hose needs to be fed
with chips as fast as possible with as little jamming as possible.
Practice for a minute near the opening so you can see what works best and
the two of you can communicate. It’s frustrating to be on the blower
end at the far side of the attic and the chips are barely coming out.
PRACTICE FIRST. A consistent supply of chips makes the job go a lot
faster and smoother. Once blowing the chips, it’s easy to communicate
with each other by talking through the hose once the blower is turned off.
Should the installer need something: less hose in the attic, less cord whatever,
it’s better to talk through the hose than crawl through a tight attic to exchange
an idea.
If the chips are being
fed properly it should look like the picture below. Blow the RBS Chips
into the air and let them settle on top of the insulation for best results
as seen below. Do not point the chip gun at the insulation, you will
be disappointed with the results as this will just create large bald spots
in your work area. Keep the blower moving back and forth to until the area
you are working with is completely covered.
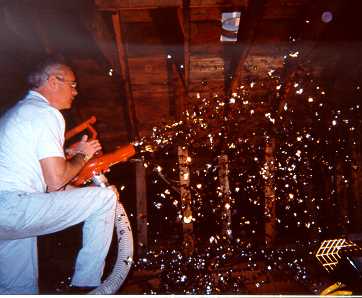
Blowing RBS Chips into the attic
WORKING IN THE ATTIC
Notice the installer is
standing on the trusses. DO NOT STAND BETWEEN THE TRUSSES OR CEILING
RAFTERS. You will quickly find your leg protruding through the ceiling.
Keep the blower moving
back and forth and blow the chips into the air and let them settle on top
of the existing insulation until it is completely covered. You will
find this difficult where the roof meets the outside walls. The
velocity of the blower will blow the chips away from your intended area.
To overcome this, stay back about five feet from the edge and make passes
back and forth until an ample supply of chips are in front of you, six to
eight feet wide. Then make ONE low pass blowing the chips into the tight
area. Then come back and re-blow the area where the chips used to be
then move towards the center of the attic. Repeat until desired area
is covered. Remember to wear a dust mask in all installations.
While the RBS Chips are not harmful, you will be working in and around material
that most likely is.
Stop when necessary to move the hose behind you or ask the feed person (by talking through the hose), to pull it out. Do not blow chips over the hose, as this will mix the chips with the insulation. Do not blow RBS Chips over canned lights (recessed lighting), bathroom fans, fresh air intakes above furnace rooms, water heater rooms or open electrical boxes.
![]()

Finished RBS Chip installation
FREQUENTLY ASKED QUESTIONS:
Q What if I have
to go into the attic for repairs after the chips are installed?
A Just move the
chips and insulation aside where you need to work and move them back when
you are done. You should have some RBS Chips left over from the installation.
Use them if needed to add more by hand at a later date.
Q Will more chips
need to be added to maintain performance?
A No, RBS Chips
have a transferable, lifetime performance warranty. To see our warranty
click here.
Q Will dust or gravity
affect the RBS Chips over time?
A No, the
RBS Chips are NOT affected by dust like single layered RBS laid down flat
in your attic.
Are the RBS Chips toxic?
No. RBS Chips are non
toxic and have a class III fire rating
Q Will RBS Chips trap
moisture?
A The shape and
size of the RBS Chip prevents moisture from condensing on the product thereby
eliminating this problem.
If you have any questions not addressed here or would like to contact us for answers regarding a specific application, please contact our Phoenix office at: 602-789-1699
![]()
MESSAGE FROM THE PRESIDENT
I would like to take this
opportunity to thank you for choosing our energy saving products.
Further, I applaud your goal of saving energy as we all need to be more
aware of what we are doing to our fragile planet. Studies have shown
the Earth has sustained irreversible damage from mankind and we must, as
the current caretakers, do what we can to preserve the future for our children
and generations beyond.
On a more personal level,
I would appreciate any photo documentation, especially in a digital format
for inclusion on our growing web site.
Thank you,

Brad Lindsay, President
Horizon Energy Systems
Back to our main page
click here
Return to RBS Chip page
click here
![]()

![]()
Web page design and maintained
by B Rad Design Group
Copyright 2003 all images and text copyrighted by Horizon Energy Systems.
All rights reserved and violators will be prosecuted. Information in this document
is subject to change without notice.
Other products and companies referred to herein are trademarks or registered
trademarks of their respective companies or mark holders.